                           .
                           .~5B.
                         ~P#@@@?
                        !@@@@@@@J.
  ^~~^:.                P@@@@@@&&BY.
  ^5@@&#G?:            !&@@@@@&!.:.
    ?@@@@@&!       .^!5@@@@@@@@G
     B@@@@@&:   ^JG&@@@@@@@@@@@?       '########::'#######::'##::::'##:'##:::'##:
    .#@@@@@@~ ^P@@@@@@@@@@@@@&7         ##.....::'##.... ##:. ##::'##::. ##:'##::
    ?@@@@@@&.^&@@@@@@@@@@@@@@7          ##::::::: ##:::: ##::. ##'##::::. ####:::
    5@@@@@@G G@@@@@@@@@@@@@@@!          ######::: ##:::: ##:::. ###::::::. ##::::
    J@@@@@@#:#@@@@@@@@@@@G?@@G.         ##...:::: ##:::: ##::: ## ##:::::: ##::::
    .P@@@@@@P#@@@@@@@@&BY. ~B@G^        ##::::::: ##:::: ##:: ##:. ##::::: ##::::
      ~YB#&@@@@@@@@@@#P7    .J&&P5!     ##:::::::. #######:: ##:::. ##:::: ##::::
         .::^^^^^^^^^^^:      .^^^:    ..:::::::::.......:::..:::::..:::::..:::::
.__. __  .__     .__ .__ .__. __ .___ __. __..__..__     .  ..__..__ .  ..   .___
|  |/  ` [__)    [__)[__)|  |/  `[__ (__ (__ |  |[__)    |\/||  ||  \|  ||   [__
|__|\__. |  \    |   |  \|__|\__.[___.__).__)|__||  \    |  ||__||__/|__||___[___
_________________________________________________________________________________
OCR Processor Module
The OCR Processor Module offers comprehensive functionality for character recognition and more. While its primary function is OCR, it also provides tools for tagging, data modeling, and exporting data to SQLite databases or spreadsheets. This document provides an overview of its key features and functionalities.
Project Selection
To start, select a project from the list:
[?] Select a Project.:
 ❯ crash_game
   IFT4_FROM_VIDEO_FILE
   IFT4_STARSHIP
After selecting a project, you will be prompted to choose a screen session:
_______________________________________________________________________________________________________________

[?] Select an Screen Session:
 ❯ 2_gyd_17-09-2024_crash_game_web
   1_fdd_14-09-2024_crash_game_web
   0_ghz_14-09-2024_crash_game_web
   ⏎ Return
OCR Processor Module Interface
Here’s an image of the project panel configuration menu for the OCR Processor Module:
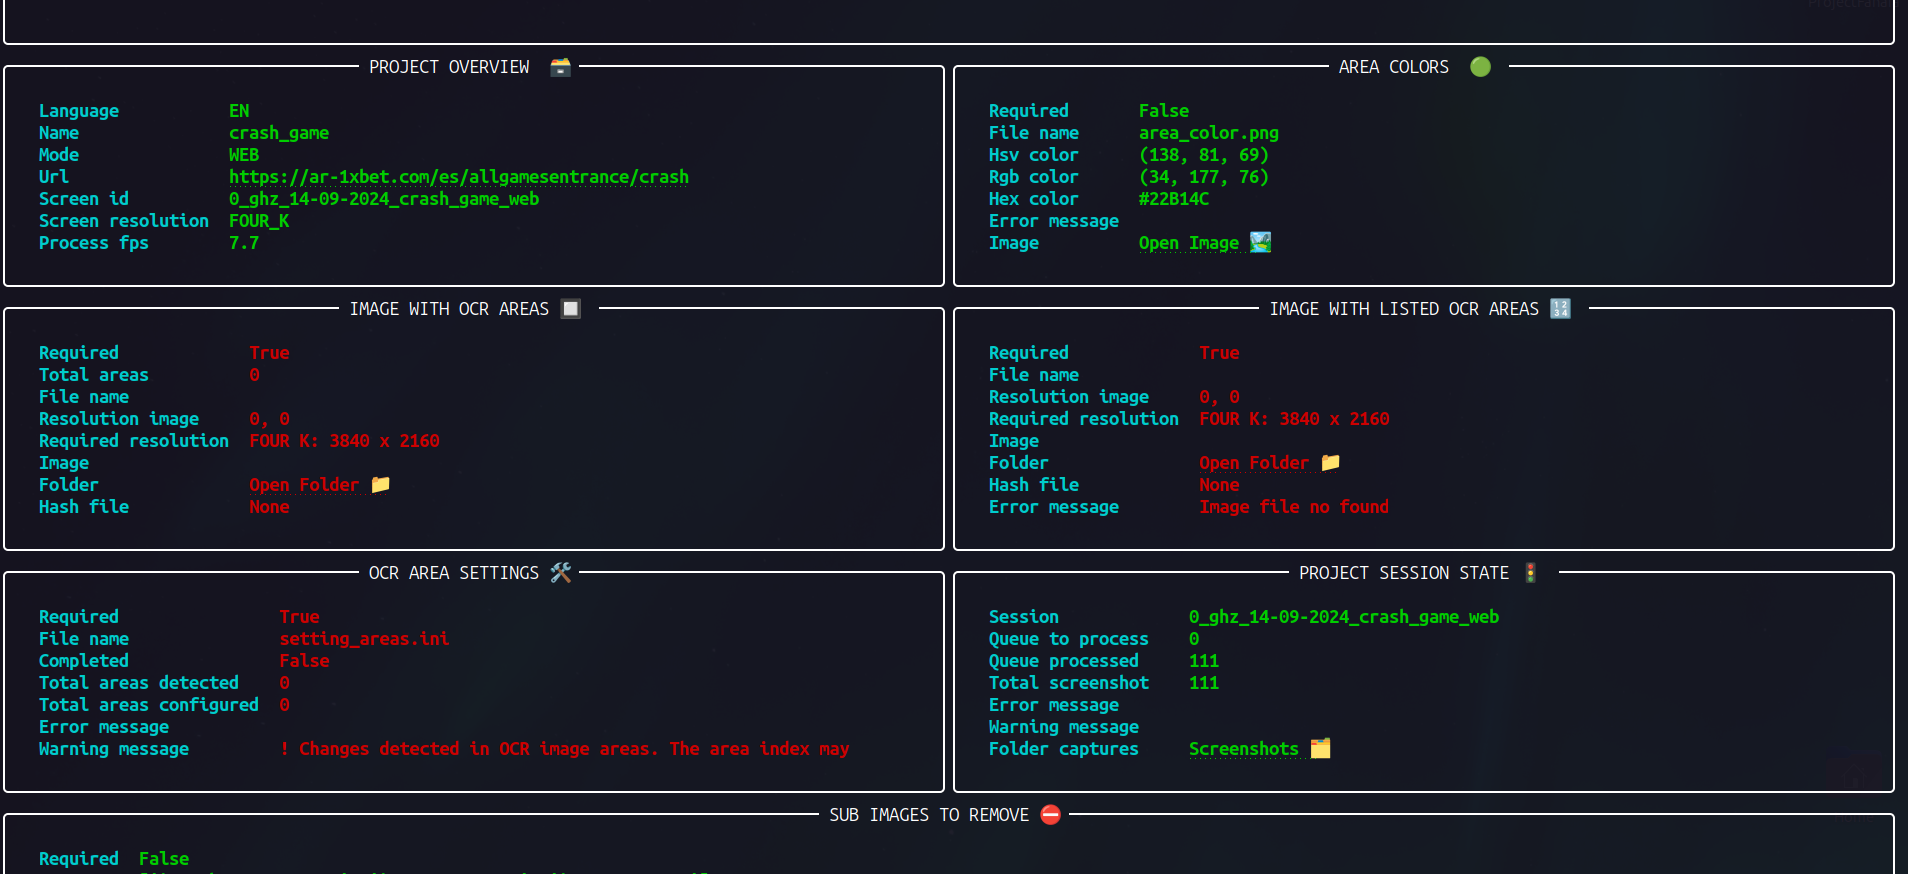
Highlighted panels indicate required settings. Start by configuring the "Image with OCR Areas." You can access further assistance through Menu No. 4.
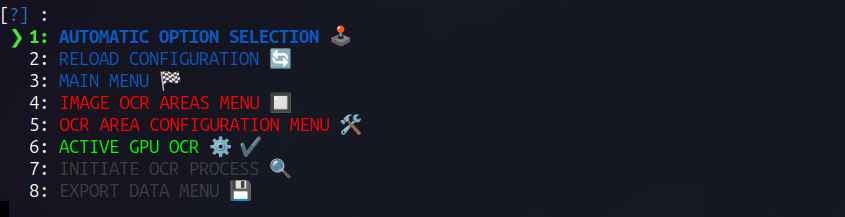
4: IMAGE OCR AREAS MENU
_______________________________________________________________________________________________________________

╭─ 1: Select an image from the captures generated by the 'Image Collector' module ───────────╮
│ Manually copy and paste an image from the captures into the folder Open Folder 📁          │
╰────────────────────────────────────────────────────────────────────────────────────────────╯
╭─ 2: Indicate the text extraction areas ────────────────────────────────────────────────────╮
│ Using a simple image editor, select the areas by drawing rectangles around them. Use the   │
│ color from the image in the Open Folder 📁                                                 │
╰────────────────────────────────────────────────────────────────────────────────────────────╯
[?] To continue select an option.:
 ❯ ➔ Continue
   Open the Project Configuration Panel
   |↩ Exit
The instructions for setting up OCR areas are straightforward. Here’s an example of how the image should look:
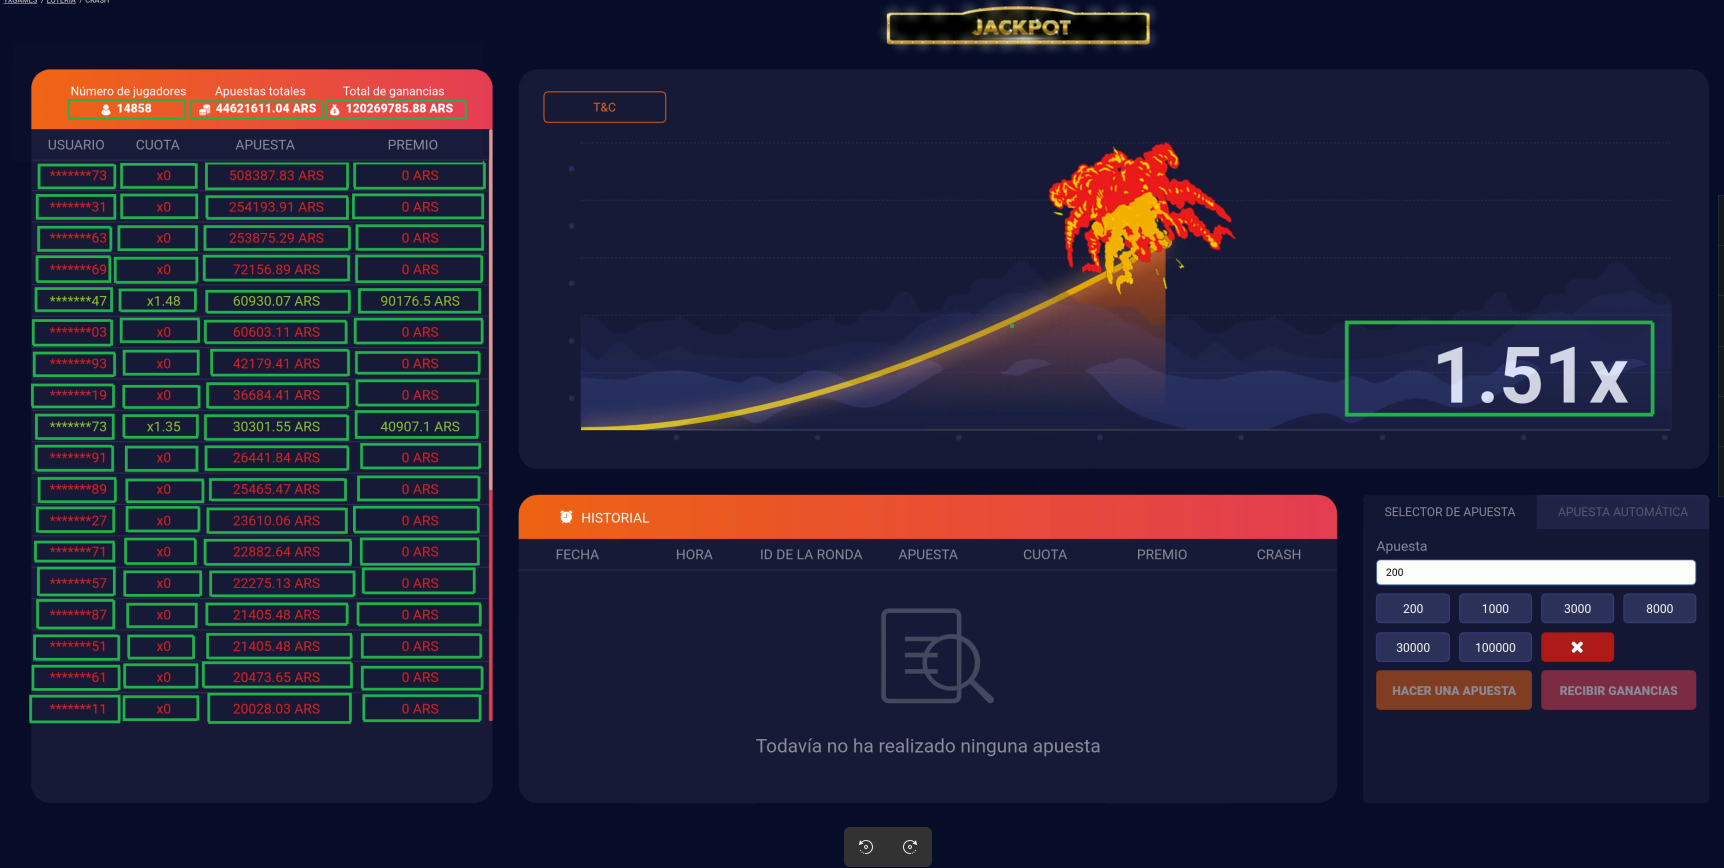
Designating OCR Areas
Green boxes represent the OCR areas where character recognition will occur. Ensure these areas are correctly placed to avoid cutting off text or including unwanted fragments. Icons or graphics in the text line may interfere with recognition; use the software’s options to exclude or remove these sub-images.
Recommendations for Accurate OCR Setup:
- Ensure Box Thickness: Boxes should have a minimum thickness of 3 pixels.
- OCR Area Placement: Place the OCR area precisely around the text, avoiding inclusion of other lines or fragments at the edges.
- Color Adjustment: If the website or video uses default colors that match the OCR areas, adjust the color of the boxes to avoid recognition issues.
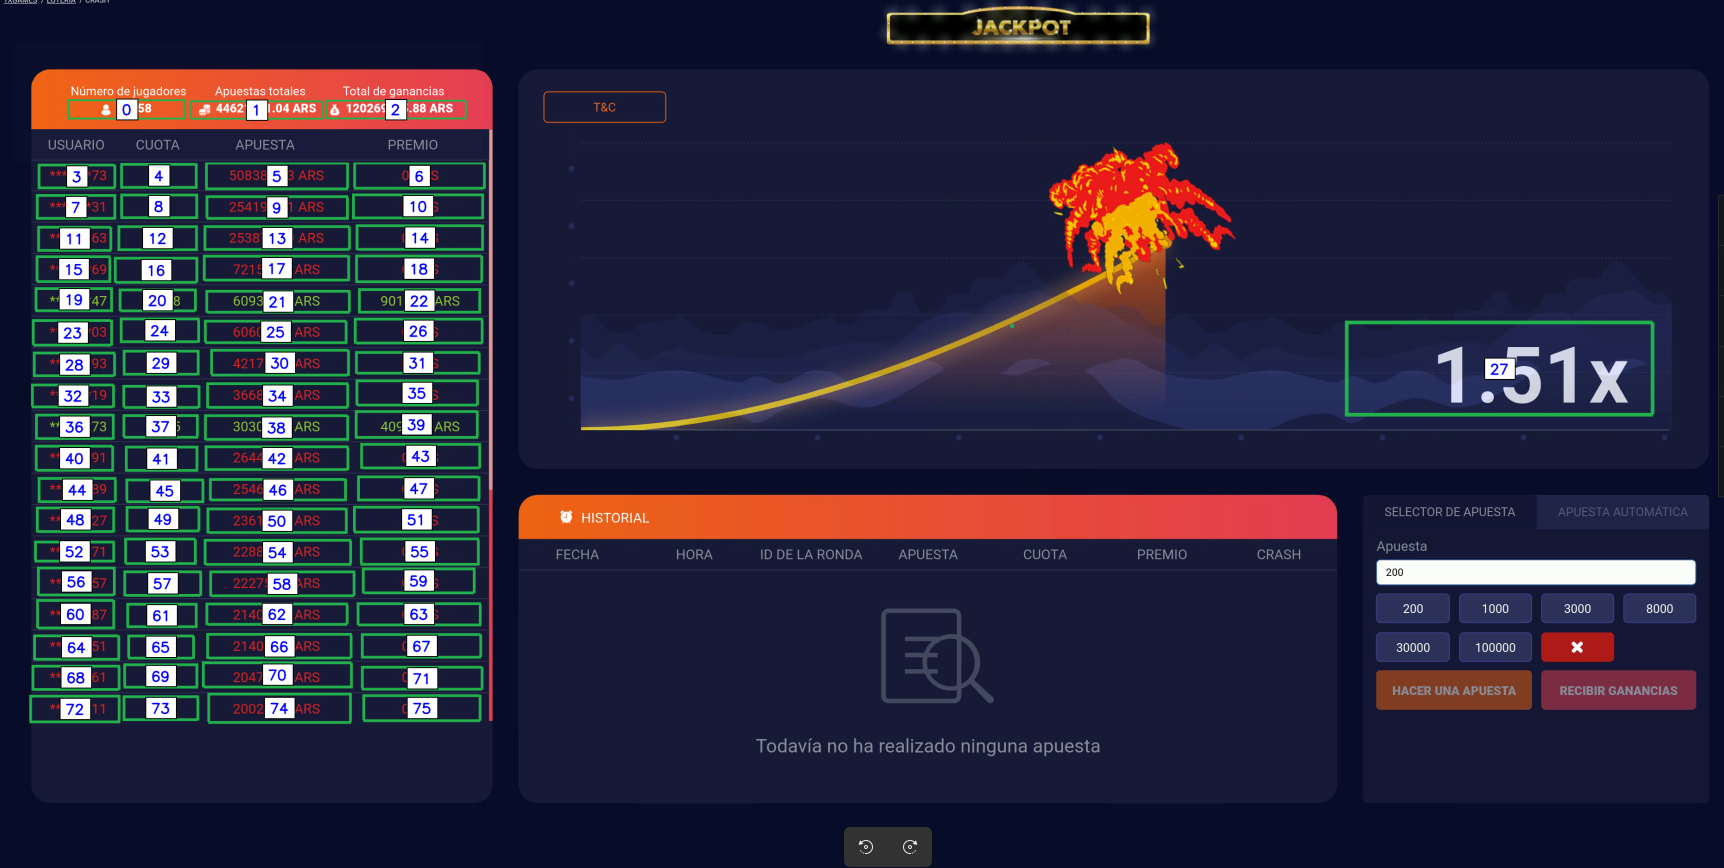
After placing the image in the designated folder, the system will automatically generate a numbered version of it.
╭───────────────── IMAGE WITH OCR AREAS 🔲  ──────────────────╮╭────────────── IMAGE WITH LISTED OCR AREAS 🔢  ──────────────╮
│                                                             ││                                                             │
│   Required             False                                ││   Required             False                                │
│   Total areas          76                                   ││   File name            areas ocr _listed.png                │
│   File name            areas ocr .png                       ││   Resolution image     3840, 2160                           │
│   Resolution image     3840, 2160                           ││   Required resolution  FOUR K: 3840 x 2160                  │
│   Required resolution  FOUR K: 3840 x 2160                  ││   Image                Open Image 🏞️                        │
│   Image                Open Image 🏞️                        ││   Folder               Open Folder 📁                       │
│   Folder               Open Folder 📁                       ││   Hash file            84b997d3e663d27ceae39a1e62f7abe8     │
│   Hash file            9dd86dbcd715f9b6042163f9723b83db     ││   Error message                                             │
│                                                             ││                                                             │
╰─────────────────────────────────────────────────────────────╯╰─────────────────────────────────────────────────────────────╯
In this example, 76 areas have been detected. The 'Hash file' variable helps identify changes in the image. If a change is detected, the image with listed OCR areas will be regenerated. Note that if the area image is deleted and reloaded, all previous settings will be lost.
Here’s how the image with labeled OCR areas will look:
![]()
If unwanted icons or objects are in the same row as the text, the OCR process might misinterpret them. To avoid this, select these sub-images and instruct the program to exclude them.
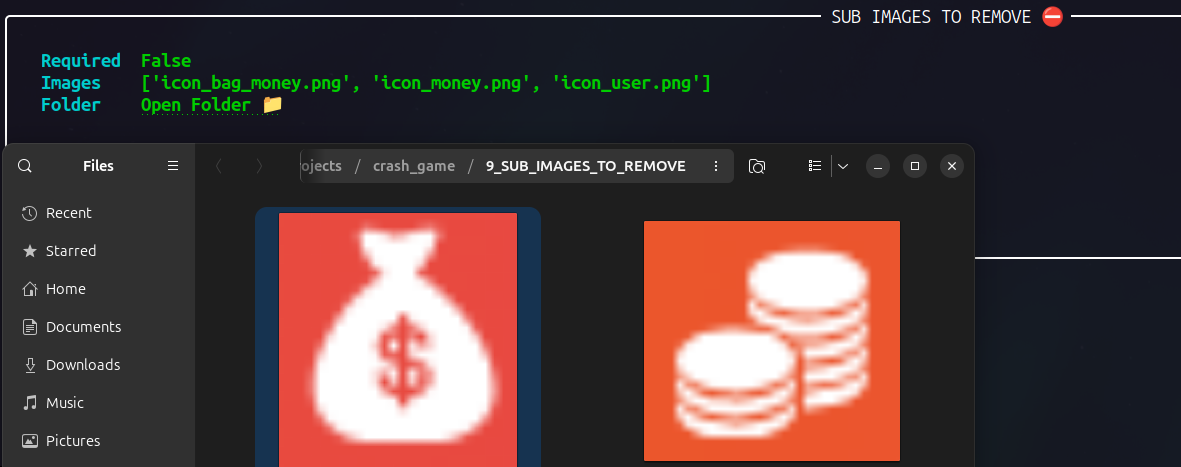
Excluding Sub-Images
To exclude unwanted areas:
- Go to the panel labeled 'SUB IMAGE TO REMOVE.'
- Save the cropped sub-images in the folder that opens when you click the link.
Labeling and Configuring the OCR Areas
To proceed with labeling and configuring the OCR areas, follow these steps by entering Menu No. 5:
5: OCR AREA CONFIGURATION MENU 🛠️ ✔️
╭─ Help Information ─────────────────────────────────────────────────────────────────────────────────────────────────────────╮
│                                                                                                                            │
│ 1: Character Recognition and Value Extraction Settings                                                                     │
│ This menu allows you to configure character recognition and value extraction for each specific area of the image. You can  │
│ adjust settings individually for each previously selected area. Options include customizing text recognition, defining     │
│ final values, and organizing areas into groups for better management.                                                      │
│                                                                                                                            │
│ 2: Labeling and Final Value Extraction                                                                                     │
│ In this step, you can assign a name to represent the final value you want to extract from each area of the image. You can  │
│ also define the data type that best suits your needs, such as text, number, or date. Additionally, you will have the       │
│ option to select a specific portion of the recognized text, allowing you to focus only on the relevant part of the         │
│ original string.                                                                                                           │
│                                                                                                                            │
╰────────────────────────────────────────────────────────────────────────────────────────────────────────────────────────────╯
╭─ Image with Enumerated Areas ──────────────────────────────────────────────────────────────────────────────────────────────╮
│                                                        Open Image 🏞️                                                       │
╰────────────────────────────────────────────────────────────────────────────────────────────────────────────────────────────╯
╭────────────────────────────────────────────────────────────────────────────────────────────────────────────────────────────╮
│                                            🛠️ ➔ Area No: 0 - TOTAL ∈ N_JUGADORES                                           │
│                                                                                                                            │
│ | Option | Setting            | Value                                      | Description                                 | │
│ |--------|--------------------|--------------------------------------------|---------------------------------------------| │
│ | 1      | Name               | N_JUGADORES                                | The name associated with this OCR area.     | │
│ |--------|--------------------|--------------------------------------------|---------------------------------------------| │
│ | 2      | Group name         | TOTAL                                      | The group name to which this OCR area       | │
│ |        |                    |                                            | belongs. is represented with this symbol ⋓  | │
│ |--------|--------------------|--------------------------------------------|---------------------------------------------| │
│ | 3      | Ocr allow list     | ['0', '1', '2', '3', '4', '5', '6', '7',   | Specifies a set of characters that are      | │
│ |        |                    | '8', '9']                                  | allowed for recognition. Only characters    | │
│ |        |                    |                                            | included in this list will be considered by | │
│ |        |                    |                                            | the OCR. Characters not in the allowlist    | │
│ |        |                    |                                            | will be ignored.                            | │
│ |--------|--------------------|--------------------------------------------|---------------------------------------------| │
│ | 4      | Ocr block list     |                                            | Specifies a set of characters to be         | │
│ |        |                    |                                            | excluded from recognition. This parameter   | │
│ |        |                    |                                            | is ignored if an allowlist is provided.     | │
│ |--------|--------------------|--------------------------------------------|---------------------------------------------| │
│ | 5      | Ocr text threshold | 0.2                                        | A confidence score threshold for including  | │
│ |        |                    |                                            | detected text in the results. Only text     | │
│ |        |                    |                                            | regions with confidence scores above this   | │
│ |        |                    |                                            | threshold will be included. Range: 0 to 1.  | │
│ |--------|--------------------|--------------------------------------------|---------------------------------------------| │
│ | 6      | Ocr low text       | 0.4                                        | A threshold for detecting text in           | │
│ |        |                    |                                            | low-quality areas. Defines the minimum      | │
│ |        |                    |                                            | confidence score for text detection in      | │
│ |        |                    |                                            | regions with blurry or low-quality text.    | │
│ |        |                    |                                            | Range: 0 to 1.                              | │
│ |--------|--------------------|--------------------------------------------|---------------------------------------------| │
│ | 7      | Final block list   |                                            | Specifies a set of characters to be         | │
│ |        |                    |                                            | excluded from The final value               | │
│ |--------|--------------------|--------------------------------------------|---------------------------------------------| │
│ | 8      | Type final value   | Integer                                    | Specifies the data type for the final       | │
│ |        |                    |                                            | value.                                      | │
│                                                                                                                            │
╰────────────────────────────────────────────────────────────────────────────────────────────────────────────────────────────╯
The software supports three languages, and this section is automatically well-documented. Thus, we will avoid duplicating interface details here. Notably, the following sections are visible:
- Help Information Panel: Provides contextual assistance.
- Numbered Image Link: Contains a link to the numbered image.
- Configuration Grid: Displays the grid for the area to be configured, labeled here as 'No. 0'.
In this grid, you will find the assigned name and group for the area, a list of recognizable characters, the threshold values for 'OCR TEXT THRESHOLD' and 'OCR LOW TEXT', and the data type for the final value.
Access these settings through the menu on the same screen. For practical purposes, here's a representation of the menu:
[?] To continue select an option.:
 ❯ 1: Enter a name to represent the final value that contains the area
   2: Assign the area to a group
   3: Set characters that are allowed to be recognized in the image area
   4: Set characters to be excluded from recognition in the image area
   5: Set confidence threshold for including detected text in the image area
   6: Set confidence threshold for detecting text in low-quality areas
   7: Set characters to be excluded from recognition to the final value
   8: Select the type of final processed value (string, integer, decimal)
   10: Copy properties from another area
   9: Run a test of the current configuration
   ➔ Menu Areas
   ⏎ Return to the Main Menu
Depending on the image quality and resolution, you may need to adjust the parameters in Menus 5 and 6. When configuring the data type for the final value, selecting 'Integer' or 'Decimal' will exclude any recognized characters that do not conform to these types. The chosen data types will determine the field type in the database upon export.
- Menu No. 1: Allows you to define the name of the area, which will later be used as a column name when exporting data to a database.
- Menu No. 2: Enables you to assign the area to a specific group or create a new group. When exporting to a SQLite database, the group name becomes the table name, and duplicate names are not permitted within the same group. If no group is defined, the area will be included as a column in all tables. If no areas have assigned groups, all areas will be exported as columns in a single table.
A particularly useful feature is Menu No. 10, which allows you to 'Copy properties from another area.' If you have previously configured another area, you can copy its settings to save time and minimize errors. In the area configuration titles, the character '∈' indicates that an area belongs to a group, while '⋓' denotes a group. Menu No. 10 presents a list of groups and areas not assigned to any group. Groups are displayed as dropdown menus; selecting a group will list all associated areas. You can then choose the area whose settings you wish to copy.
Since each group name must be unique, the newly configured area's name will mirror the original area’s name with consecutive numbering. If the original area’s name includes a number, it will be incremented by +1 for the new area, regardless of its position in the name.
 ❯ 10: Copy properties from another area
   9: Run a test of the current configuration
   ➔ Menu Areas
   ⏎ Return to the Main Menu

[?] Select the area from which to copy the configurations:
 ❯ ⋓ TOTAL
   ⋓ APUESTAS
   AVION_CUOTA
   ➔ Menu Areas
Testing the OCR Configuration
To ensure the accuracy of your OCR configuration, you need to run a test. Follow these steps:
1. Running the Configuration Test
Option Number 9:
 ❯ 9: Run a test of the current configuration
   ➔ Menu Areas
   ⏎ Return to the Main Menu

╭────────────────────────────────────────────────────────────────────────────────────────────────────────────────────────────╮
│ To run a configuration area test, you need to COPY some images from the capture folder Open Folder 📁  to the test folder  │
│ ➔ Open Folder 📁 .                                                                                                         │
╰────────────────────────────────────────────────────────────────────────────────────────────────────────────────────────────╯
[?] To continue select an option.:
 ❯ ➔ Continue
   ⏎ Return
2. Image Review and Testing
Copy some images from the captures generated by the 'collector' module into the folder indicated by the program. The goal is to review the captures and select the most representative and varied ones to obtain a test that more accurately reflects the final result.

In this example, we used 6 images from area '0', corresponding to 'N_JUGADORES' in the group 'TOTAL'. As you can see in the grid, we can open the links to the cropped areas of the original image. You will also notice that the icon that was originally present has been removed by the software, due to the previous configuration to exclude certain sub-images.
You can view all areas in the 'Areas Menu.' In this example, all listed areas are configured.
 Once all areas are configured, option 7 will be activated.
7: INITIATE OCR PROCESS 🔍
If we have a graphics accelerator compatible with CUDA, we can enable GPU usage to speed up the OCR process.
6: ACTIVE GPU OCR ⚙️ ✔️
 ❯ 6: ACTIVE GPU OCR ⚙️  ✔️
   7: INITIATE OCR PROCESS 🔍
   8: EXPORT DATA MENU 💾

[?] This is optional and only valid for graphics cards with CUDA support. If enabled, the character recognition process w...:
 ❯ Enable GPU for the OCR processor
   Disable GPU for the OCR processor
   ⏎ Return
Let's start the OCR process.

When processing the first screenshot, you can preview the result and see it removed from the processing queue.
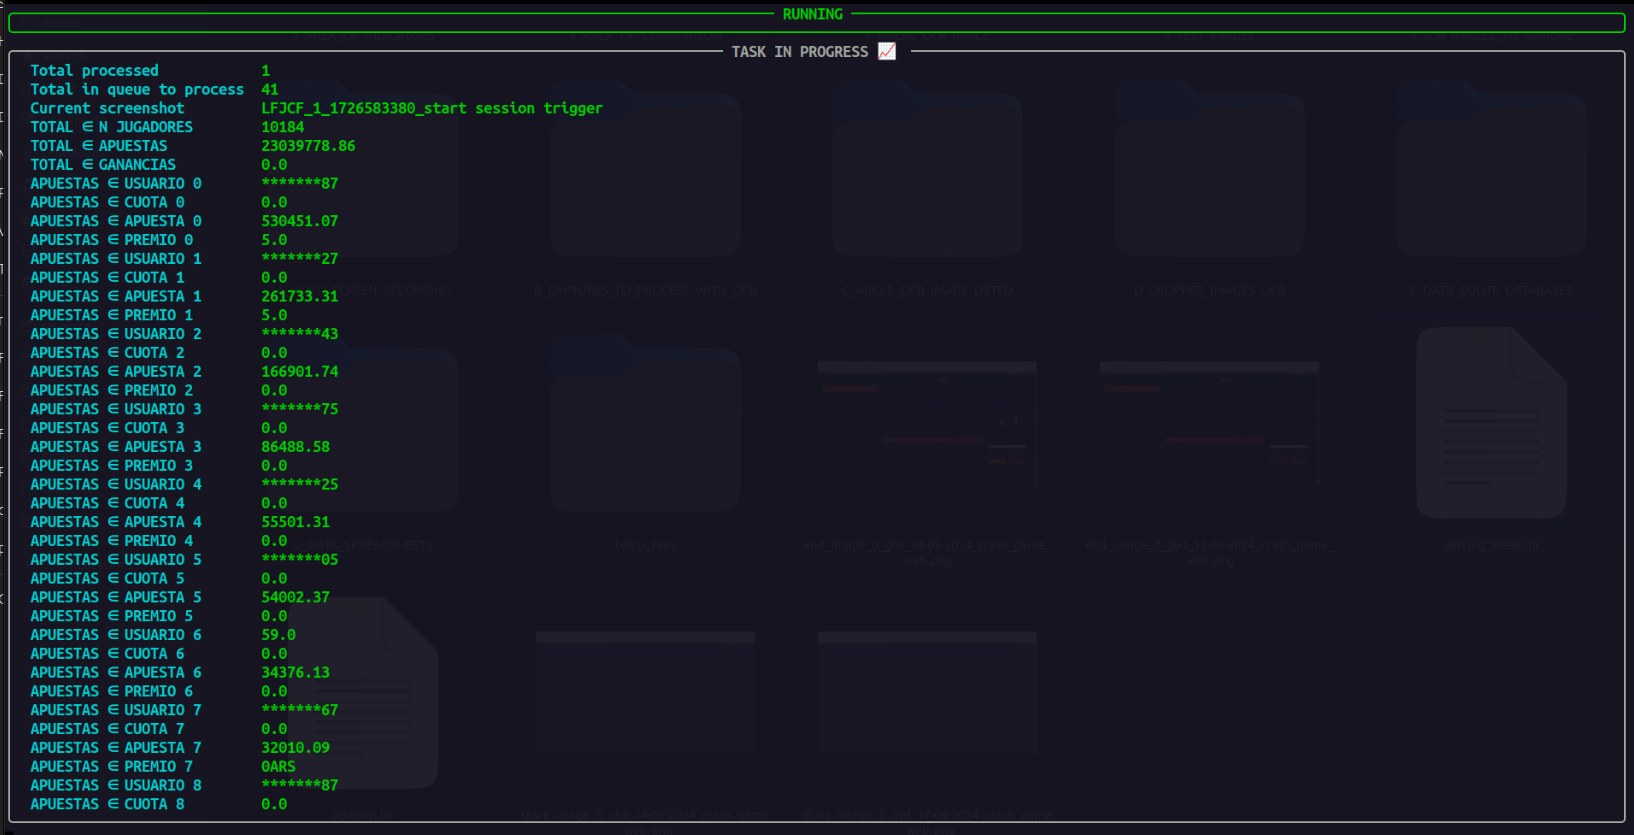
Ocr area Setting & Project Session State Panel:
In this example, we can see that there are no 'screenshots' pending for processing, we have processed a total of 111 images, and this number matches the total captures. If, for some reason, some of these images are deleted to prevent their processing, the system will only notify the deletion, but the process will continue without issues. Additionally, you can access the 'screenshots' folder and the folder where the data exported to the database is stored.
╭─────────────────── OCR AREA SETTINGS 🛠️  ───────────────────╮╭───────────────── PROJECT SESSION STATE 🚦  ─────────────────╮
│                                                             ││                                                             │
│   Required                False                             ││   Session             0_ghz_14-09-2024_crash_game_web       │
│   File name               setting_areas.ini                 ││   Queue to process    0                                     │
│   Completed               True                              ││   Queue processed     111                                   │
│   Total areas detected    76                                ││   Total screenshot    111                                   │
│   Total areas configured  76                                ││   Error message                                             │
│   Error message                                             ││   Warning message                                           │
│   Warning message                                           ││   Folder captures     Screenshots 🗂️                        │
│                                                             ││   Folder db sqlite    SqLite DB 🗂️                          │
│                                                             ││                                                             │
╰─────────────────────────────────────────────────────────────╯╰─────────────────────────────────────────────────────────────╯
Exporting the Data
The options for exporting to SQLite or a spreadsheet are similar, so we will describe the database export options. First, we enter a name for the SQLite database file. There’s no need to specify the file extension, as it will be added automatically.
1. Choosing the Export Format
Option Number 8:
 ❯ 8: EXPORT DATA MENU 💾

[?] :
 ❯ Create and Export to a SQLite Database
   Export to an Existing SQLite Database
   Export to a Spreadsheet
   Clear Processed Queue
   ⏎ Return

[?] Enter a name for the database, or type 'cancel' to abort.: my db file name
2. Selecting Additional Columns
You can include additional columns obtained from the 'Collector' module in your project tables:
_________________________________________________________________________________

[?] Use keys: ←  → | ↲ Next |  ↓ ↑ . Select the columns to be inserted into all groups of the Areas.:
   ◉ ➤ Default
   ◯ Unique identifier for the session.
   ◉ Indicates if the screenshot was taken at the start of the session.
   ◯ Indicates if the screenshot was taken at the end of the session.
 ❯ ◉ Indicates if the screenshot was triggered by a change detected in the frame.
   ◯ The number assigned to the capture within the session.
   ◯ Full date in YYYY-MM-DD format.
You can also select other columns that may be relevant to your project.
3. Including Specific Area Columns
Define additional columns specific to each area:
_________________________________________________________________________________

[?] Use keys: ←  → | ↲ Next |  ↓ ↑ . Columns to include for each defined area.:
   ◉ ➤ Default
   ◯ Identifier for the specific area listed in the image.
   ◯ Raw OCR (Optical Character Recognition) value detected from the image.
 ❯ ◉ Link to the cropped image of the specific area.
Final Steps
In this example, our database looks like this:

When exporting to a spreadsheet and selecting the 'Link to the Cropped Image...' option, we can easily open the cropped images and verify that the interpretations are correct.
