                             .
                           .~5B.
                         ~P#@@@?
                        !@@@@@@@J.
  ^~~^:.                P@@@@@@&&BY.
  ^5@@&#G?:            !&@@@@@&!.:.
    ?@@@@@&!       .^!5@@@@@@@@G
     B@@@@@&:   ^JG&@@@@@@@@@@@?       '########::'#######::'##::::'##:'##:::'##:
    .#@@@@@@~ ^P@@@@@@@@@@@@@&7         ##.....::'##.... ##:. ##::'##::. ##:'##::
    ?@@@@@@&.^&@@@@@@@@@@@@@@7          ##::::::: ##:::: ##::. ##'##::::. ####:::
    5@@@@@@G G@@@@@@@@@@@@@@@!          ######::: ##:::: ##:::. ###::::::. ##::::
    J@@@@@@#:#@@@@@@@@@@@G?@@G.         ##...:::: ##:::: ##::: ## ##:::::: ##::::
    .P@@@@@@P#@@@@@@@@&BY. ~B@G^        ##::::::: ##:::: ##:: ##:. ##::::: ##::::
      ~YB#&@@@@@@@@@@#P7    .J&&P5!     ##:::::::. #######:: ##:::. ##:::: ##::::
         .::^^^^^^^^^^^:      .^^^:    ..:::::::::.......:::..:::::..:::::..:::::
._..  ..__..__ .___     __ .__..   .   .___ __.___..__..__     .  ..__..__ .  ..   .___
 | |\/|[__][ __[__     /  `|  ||   |   [__ /  ` |  |  |[__)    |\/||  ||  \|  ||   [__
_|_|  ||  |[_./[___    \__.|__||___|___[___\__. |  |__||  \    |  ||__||__/|__||___[___
_______________________________________________________________________________________
![]()
Module "Collector" Documentation
Main Objective:
The primary purpose of the Collector Module is to obtain screenshots.
The software provides an interface that guides us through the process and allows us to monitor the variables or properties of the project. You can obtain screenshots from websites and video files.
The primary purpose of the "Collector Module" is to obtain screenshots.

The software offers an interface that guides us through the process and allows us
to monitor the variables or properties of the project.

We can obtain screenshots from websites and video files.
Start Menu:
[?] Start 🏁:
 ❯ Change Language.
   New Project.
   Continue with an Existing Project.
Web & Video File Mode
[?] Type a name for the project: CRASH GAME
[?] Select a source:
   Use a video file to extract images
 ❯ Use a web page to extract images
Web Mode:
You can use any website that does not require authentication. If the website is YouTube, the software maximizes the screen and plays the video.
It's possible to select a maximum resolution of 5K (5120 pixels wide by 2880 pixels tall). This allows more content to be loaded from a website or text to be rendered with a higher pixel count, improving the OCR process results.
Once the project name, website, and resolution are entered, the program asks how long you want the video to last to take screenshots for configuration purposes.
-
Selection of Virtual Screen Resolution:
A lower resolution increases FPS in all image detection and capture processes but reduces the accuracy of optical character recognition. A 4K resolution (3840x2160) is recommended for most requirements. -
Preparing the Screen Recording:
We will record the screen of the selected website. Adjust the recording duration as needed to capture the initial images of interest on the website. Ensure the recording time is sufficient to capture all relevant information.
[?] Select the virtual screen resolution to be used throughout the project.:
 ❯ FOUR K: 3840 x 2160
   FULL HD: 1920 x 1080
   TWO K: 2560 x 1440
   FIVE K: 5120 x 2880
   ⏎ Return to the Main Menu
   Welcome menu.
   ⊠ Close.
Video File Mode:
╭─ 1: Video Source ──────────────────────────────────────────────────────────────────────────╮
│ You must save the video at: Open Folder 📁  so that the program can detect and take        │
│ snapshots                                                                                  │
╰────────────────────────────────────────────────────────────────────────────────────────────╯

[?] To continue select an option.:
 ❯ ➔ Continue
   ⏎ Return
   ⊠ Cancel
In this case, the resolution is determined by the resolution of the video file. There is no need to generate a new video to get the images required for configuration, as snapshots of the same video can be used.
Screen Session:
A screen session is a set of capture sessions. It helps separate different sets of captures, which is useful if you want to take screenshots at different times or test different capture configurations.
New Screen Session Menu:
11: NEW SCREEN SESSION 🗂️ ✔️
Capture Session:
The start and end of a capture session are determined by detecting a previously configured image in the program for this purpose. Depending on the project, a screen session can contain an unlimited number of capture sessions.
The process of capturing a website can operate in a continuous loop or for a pre-established duration. This process monitors a defined area, looking for the image set as a trigger. Upon detecting the image, the capture begins, and a unique session ID is generated.
The process can be paused using Ctrl + Z or completely stopped with Ctrl + C.
Project OverView Panel: IFT4 STARSHIP EXAMPLE:
╭──────────── PROJECT OVERVIEW 🗃️  ───────────╮╭──────── VIDEO SCREEN RECORDING 📹  ─────────╮
│                                             ││                                             │
│   Language           EN                     ││   Required          False                   │
│   Name               IFT4_STARSHIP          ││   File name         0_acc_14-09-2024_ift…   │
│   Mode               WEB                    ││   Duration seconds  46.70                   │
│   Url                https://www.youtube…   ││   Resolution        (3840x2160)             │
│   Screen id          0_acc_14-09-2024_if…   ││   Fps               7.43                    │
│   Screen resolution  FOUR_K                 ││   Error message                             │
│   Process fps        7.43                   ││   Video             Open Video 🎬           │
│   Folder             Open Folder 📁         ││   Folder            Open Folder 📁          │
╰─────────────────────────────────────────────╯╰─────────────────────────────────────────────╯
Main Menu for "Collector" Module:
[?] :
 ❯ 1:  SELECT AN AUTOMATIC OPTION 🕹️
   2:  RELOAD SETTINGS 🔄
   3:  START MENU 🏁
   4:  MENU - VIDEO SCREEN RECORDING 📹  ✔️
   5:  MENU - START IMAGE SESSION INDICATOR 🖼️  ✔️
   6:  MENU - END IMAGE SESSION INDICATOR 🖼️  ✔️
   7:  MENU - IMAGES OF CAPTURE INDICATORS 🖼️  ✔️
   8:  MENU - AREA OF INDICATORS IMAGES 🔲  ✔️
   9:  MENU - AREA OF COMPARISON 🔲   ✔️
   10: MENU - COLOR OF AREAS 🟢  ✔️
   11: NEW SCREEN SESSION 🗂️  ✔️
   12: START CAPTURE PROCESS 📸
Note: If a required configuration is not present, menus #10 and #11 will not be available.
Start Sesssion Image
Using the video generated by the Foxy Collector program, we will capture a snapshot of the frame containing the image we will use as a trigger. For this task, I recommend using VLC Media Player. Open the snapshot in any image editor and crop the section you want to use. The shape of the image can be anything, but the simplest option is to crop a square or rectangle. The program will indicate where to save this image.

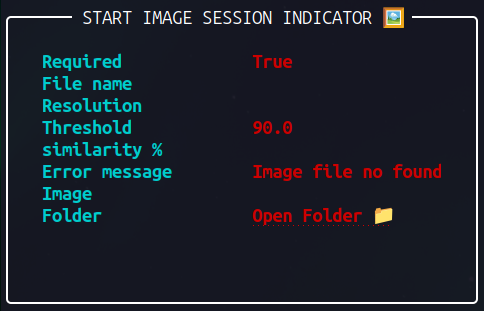
Start Session Indicator Panel
This panel shows if the login image is present in the designated folder. If the image is missing, the system will indicate that it is required.
The Threshold parameter can be adjusted in Menu No. 5. This parameter defines how similar the image must be to be considered the login image, with a default value of 90%.
5: MENU - START IMAGE SESSION INDICATOR 🖼️ ✔️
╭─ 1: Start Image Session Indicator Preparation ─────────────────────────────────────────────╮
│ We will use this video to obtain the necessary snapshots to configure the system. To       │
│ extract these snapshots, we recommend using VLC Media Player Open Video 🎬                 │
╰────────────────────────────────────────────────────────────────────────────────────────────╯
╭─ 2: Image Selection ───────────────────────────────────────────────────────────────────────╮
│ Play the video in VLC Media Player and pause at the exact moment where you want to capture │
│ the image that will mark the start of the process and session. This image is crucial as it │
│ will trigger the beginning of the automated capture.                                       │
╰────────────────────────────────────────────────────────────────────────────────────────────╯
╭─ 3: Image Cropping ────────────────────────────────────────────────────────────────────────╮
│ Once you've captured the image, you may need to crop it to include only the specific       │
│ portion that is representative and unique. On Windows, you can use Paint to perform this   │
│ cropping. If you're on Mac OS or Linux, use any available image editor that offers similar │
│ functions.                                                                                 │
╰────────────────────────────────────────────────────────────────────────────────────────────╯
╭─ 4: Saving the Image ──────────────────────────────────────────────────────────────────────╮
│ Save the cropped image in the folder designated for this purpose. The path to save the     │
│ image is: Open Folder 📁                                                                   │
╰────────────────────────────────────────────────────────────────────────────────────────────╯
[?] To continue select an option.:
 ❯ ➤ Continue
   ⏎ Return to the Main Menu
   Change minimum similarity threshold. The current value is 90.0 %
   Welcome menu.
   ⊠ Close.
Additionally, the image resolution must be equal to or lower than the project resolution.

By using Ctrl + Click on the links, you can open the image and the folder where the file should be placed.
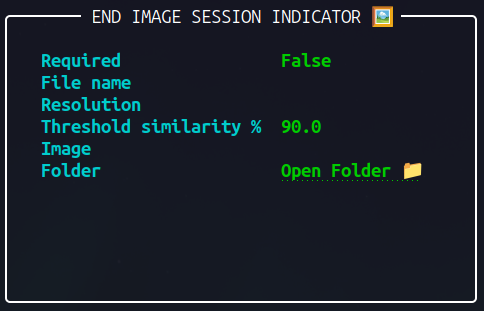
End Session Image
The end session image is optional. It is used to indicate the closure of a capture session and to take a screenshot at the stop moment.
6: MENU - END IMAGE SESSION INDICATOR 🖼️ ✔️
When a session is closed, the program will take a new capture only if it detects the login image again, repeating the process successively until the user decides to end it.
End Session Indicator Panel
Capture Indicator Images
Both the image used to indicate the start and the end of a session serve to mark a capture. However, if we want to take additional captures between the start and end of the session, it is possible to define a set of images that will be used to indicate these captures during the session. This image could even be the same one used to start the session, depending on what you want to achieve.
7: MENU - IMAGES OF CAPTURE INDICATORS 🖼️ ✔️

Indicator Image Area
Using any snapshot from the video generated by Foxy Collector, you should draw a rectangle in the area of the image where the indicator images may appear, using any image editor. This area can cover the entire screen, but to improve capture process performance, it is recommended to adjust it to a specific section.
8: MENU - AREA OF INDICATORS IMAGES 🔲 ✔️
The default color for drawing this square/rectangle is RGB (34, 177, 76). You can copy the color from the image located in the folder indicated by the panel.
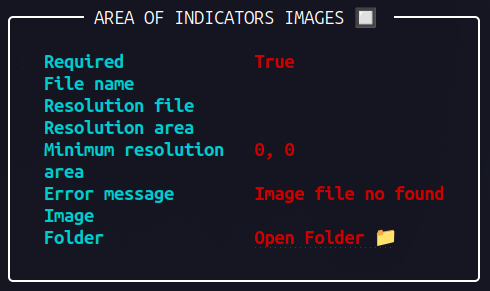
The minimum resolution is determined by the largest resolution of the indicator images.
10: MENU - COLOR OF AREAS 🟢 ✔️
If you need to change the color, simply replace the color in the image with another one. This may be useful if the website or video uses the same color in its interfaces.

Comparison Area
This area is not required to start the capture process but can be very useful if we want to take captures when changes are detected in a specific section or the entire screen. As with the indicator image area, draw a rectangle/square in the area where you want to monitor changes. The system will take a screenshot of the entire screen when a change is detected in that area.
9: MENU - AREA OF COMPARISON 🔲 ✔️
The Threshold Difference parameter is adjustable in Menu 9. The default value is 5%, indicating that a screenshot will be taken if the change detected between the current image and the previous frame is equal to or greater than 5%.

Start Capture Process
We can define a duration in minutes and seconds, or set an indefinite duration by entering 0.
❯ 12: START CAPTURE PROCESS 📸

Set the desired capture process duration in minutes and seconds.
For example, 5.30 means 5 minutes and 30 seconds, or enter 0 for an indefinite
value.

[?] Enter a value to set the duration of the capture process.:
Capture Process Panel (SCREEN SESSION)
╭────────────────────────────── SCREEN SESSION 📸  ──────────────────────────────╮
│                                                                                │
│   Session name              0_acc_14-09-2024_ift4_starship_web                 │
│   Current task              Main process: processing snapshot n° ➔ 6002        │
│   Total captures files      585                                                │
│   Elapse process percent %                                                     │
│   Elapse process time       00:08:47                                           │
│   Fps process               11.38                                              │
│   Total  sessions           1                                                  │
│   Updated at                UTC 03:56:32                                       │
│   Folder                    Open Folder 📁                                     │
╰────────────────────────────────────────────────────────────────────────────────╯
- Session Name: The name of the current session.
- Current Task: The system will display the name of the ongoing task for better clarity during the process.
- Total Captures Files: The total number of captures obtained in real-time.
- Elapsed Process Percent: If a process duration has been defined or a video file is being processed, this indicates the progress percentage.
- FPS Process: Number of frames analyzed per second.
- Updated At: The last time the screen was updated, displayed in UTC 0. You may need to adjust this time according to your timezone.
- Folder: Folder where the captures are stored.